
Contents
1. Draw Cloud Shape
1. Select the Draw Shape tool
tool2. Select the oval shape
3. Draw an oval shape on the scene.

FIGURE 1-1 draw the basic shape
2. Draw Profile Curve
1. Select the Add Point tool.
tool.2 & 3. Click then drag to the second point to create two points.
4 & 5. Click and drag up to create the third point.
")
FIGURE 2-1 draw the curve (Animated: 5 frames)
3. Round Profile Curve
1. Select the Curvature tool
tool2 & 3. Click on the top point and drag to the right to round the curve. (Right = round, Left = sharp)

FIGURE 3-1 Round the curve
4. Connect Cruve Profile
1. Select the Translate Points tool
tool2. Click on the drawn cloud
3. Select the Curve Profile
 tool
tool4. Click on the curve profile line that we drew in step 2
5. Change the 'Repeat count' to 10
")
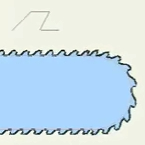
FIGURE 4-1 Connect the curve profile to the shape (Animated: 5 frames)
5. Move Points
1. Select the Translate Points tool2. Click on a point in the cloud and move it to get your desired cloud shape. Notice how the curves are affected with the position of your points.

FIGURE 5-1 Move the points to create your cloud
6. Style Clouds
1. Select the cloud with the Select Shape tool
tool2. Select the 'Advanced' style option so that you can apply more than one style

FIGURE 6-1 Select the 'Advanced' style option
3. Set Effect 1 to 'Gradient'. Set the colours to go from white to light grey.

FIGURE 6-2 Style Options
4. Change the direction of the style so that it goes diagonally.
5. Set Effect 2 to 'Drop Shadow' (The default setting is fine for this example) - Note, shadows can also be set in the layer's settings.
6. Turn off the Stroke if it's on.
Copy the layer a few times. Move and resize them and you'll soon have a nice looking sky.

FIGURE 6-3 Final Result
The 'Supporting Content' below contains the final file - saved using Anime Studio Pro 10.0
Supporting Content
Download Details
Zip File Size: 12KB
Last updated: 19 Mar 2014 05:04:13
Made with: Anime Studio Pro 10
File Name: anime_studio_tutor_files_254.zip
Last updated: 19 Mar 2014 05:04:13
Made with: Anime Studio Pro 10
File Name: anime_studio_tutor_files_254.zip
Rate This Tutorial
Once you have completed this tutorial, please give it a rating:
2 Rates
(5)
Comments
-
Member Since: 4 March 2014Last Logged In: 23 December 2023Comments: 9Tutorials Completed: 20Wow I have never used the curve profile that's awesome!


Other Tutorials In This Category
-
 Curve Profiles4 Rates (4.8)
 -
 How to create a reference background2 Rates (5)
 -
 Binding Shades with Smart Bones1 Rating (5)
 -
 Hide Points in Anime Studio1 Rating (5)


Please use the 'reply' button on a comment if you wish to reply to someone.