Basic Eye Rig
Tutorial Number: 151
Made with: Anime Studio Pro 9
Level: Basic
This tutorial shows one way to set up a basic eye rig in Anime Studio, using bones and masked layers.
Using the 'Bone Offset' tool the pupils can be moved quickly with ease.
There are two examples:
1. Pupils on one masked layer - Pupils can cross over to the other eye
2. Pupils split into two masked layers - Pupils can't cross over
Contents
1. Set up The Layers
There are many ways to set up a good eye rig, but this is a quick an easy method that is useful to know.In summary, this method involves masking the eyes and moving them with the 'Bone Offset' tool.
Lets start by creating a few layers. We'll need a bone layer with two vector layers within and another vector layer for the face.

FIGURE 1-1 Layers required
You can see here that the two vector layers are grouped within the bone layer. To do this, simply drag the vector layers into the bone layer.

FIGURE 1-2 How to group layers in Anime Studio
2. Draw The Eyes
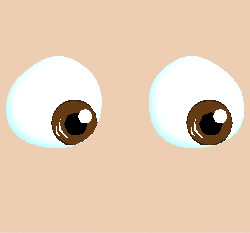
Draw one eye in the eye layer, then copy the points and flip them (1 in Figure 2-1) to create the opposite.
FIGURE 2-1 Draw the eyes
To add the shading effect, select the eye shape with the 'Select Shape' tool, then in the style menu on the right, select the advanced option (1 in Figure 2-2). With the extra options shown, select shaded effect as 'Effect 1' (2 in Figure 2-2), then enter your settings.

FIGURE 2-2 Adding the shading effect
Next, draw the pupils in the pupil layer. Draw the left side then copy and paste it, then move it over to the right. Align the pupils so that they are centre in the eyes.

FIGURE 2-3 The pupils
3. Add A Control Bone
Click on the bone layer which we have called 'Eyes', and add a new bone using the 'Add bone' tool and name it 'eyes'.Using the 'Bone Strength' tool set this bone's strength to 0.
It's a good idea to position the bone close to the eyes so that we know where it is.

FIGURE 3-1 Control Bone Added
4. Bind The Pupils Layer
We're going to be using the bone we have just created to control the pupils, so now we need to tell Anime Studio which layers we want the bone to be associated with.1. Click on the 'Pupils' layer
2. Select the 'Bind Layer' tool
3. Select the bone

FIGURE 4-1 Bind the layer to the bone
5. Add The Masking
Open the bone layer's settings (double click on the layer), go to the masking tab, and set it to 'Hide all'
FIGURE 5-1 Masking setup of the bone layer
Next, open the settings for the vector layer we called 'eyes' and set the masking options to '+ Add to mask'

FIGURE 5-2 Masking settings for the eyes layer
6. Animating The Eyes
To animate the eyes, simply:1. Select the bone layer
2. Select the 'Offset Bone' tool
3. Move the bone around to animate the pupils

FIGURE 6-1 Moving the eyes
7. Improving The Rig
When animating the eyes, you may find that for some character designs the pupils might mistakenly move from one eye to the other. One way to fix this problem is to separate the eyes and pupils into left and right eyes (So that we have layers for Eye Left + Pupil Left and Eye Right + Pupil Right)
FIGURE 7-1 Separate layers for left and right eyes
To modify our example to incorporate this, you could cut and paste the points of one of the eyes into the relevant new layers, then re-bind the new layers to the bone.
One bone may have many associated layers, but it is important that the layers are all grouped under that bone's layer.
There is an example of both set-ups in the supporting files.
Supporting Content
Download Details
Zip File Size: 5KB
Last updated: 5 Oct 2012 04:47:36
Made with: Anime Studio Pro 9
File Name: anime_studio_tutor_files_151.zip
Last updated: 5 Oct 2012 04:47:36
Made with: Anime Studio Pro 9
File Name: anime_studio_tutor_files_151.zip
Rate This Tutorial
Once you have completed this tutorial, please give it a rating:
2 Rates
(5)
Comments
Be the first to add your voice here!
Please first login to add your comments
Other Tutorials In This Category
-
 How to create a UNIVERSAL eye rig1 Rating (5)
 -
 Smart Bones5 Rates (3.6)
 -
 Smart bone rigging in AS 9 Pro6 Rates (4.3)
 -
 Flexi-Binding Pit Fall1 Rating (5)