Layer Blending Effects
Tutorial Number: 329
Made with: Anime Studio Pro 11.2
Level: Intermediate
In this tutorial you will see how easy it is to use the layer blending modes in Anime Studio to change the colour of your animations.
Normally these effects would be added to your rendered videos in a video editor. But knowing how to do it in Anime Studio may come in handy.
This effect can be added to the whole video or you could use it in isolation.
Contents
1. Download and Unzip
For your convenience, a selection of effects have been saved into one Anime Studio file that you can import when needed. This file is called blends.anime and was created in Anime Studio Pro 11.2Start by downloading the supporting document below.
Unzip the contents to a folder on your computer.
2. Import The Effect
Open your Anime Studio scene/project and import the required effect from blends.animeFor now, import the B&W effect:
File > Import > Anime Studio Object... Select the B&W layer and click 'OK'

FIGURE 2-1 Select B&W
3. Resize Effect Layer
Resize the new imported B&W vector layer so that it covers all of your scene.4. Render
At this point you can simply render your scene and see the result...File > Preview

FIGURE 4-1 Before and after the effect
If you look at the B&W layer settings, you will see that the layer blending mode is set to saturation.

FIGURE 4-2 Select 'saturation' in the layer blending mode
5. Other Effects
You can have more than one layer with its blending mode set.You can also apply a colour to the vector shape on the effect layer.
Changing the effect layer's transparency will change the intensity of the blend.
You will see that in red, yellow, blue and green groups of blends.anime file, there are 50% and 25% transparency versions to play with.

FIGURE 5-1 Change the colour for different effects
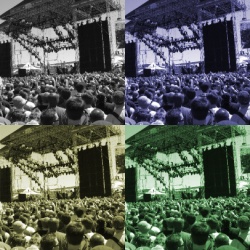
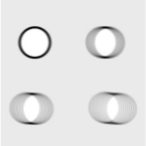
In the following image you can see some of the possible combinations.. top left is B&W + Blue at 25% transparency.

FIGURE 5-2 Different blending effects
Tip
Anime Studio ships with three layer effects that would work well with these blend modes:
File > Import > Effects > Camera Effects > Select from Scratches (animated), Sepia and Vignette
Here is an example with B&W, vignette and scratches applied.

FIGURE 5-3 All the effects together
To add to the old look effect, the project also has noise gain added:
File > Project Settings.. > Set the noise gain.

FIGURE 5-4 Set the noise gain to 60
Extra
This is how the blending modes work in Anime Studio:

FIGURE 5-5 Blending Modes
The blending modes in Anime Studio are very much like those used in GIMP - You can read more about GIMP's blending modes here
Supporting Content
Download Details
Zip File Size: 593KB
Last updated: 8 Feb 2016 13:00:02
Made with: Anime Studio Pro 11.2
File Name: anime_studio_tutor_files_329.zip
Last updated: 8 Feb 2016 13:00:02
Made with: Anime Studio Pro 11.2
File Name: anime_studio_tutor_files_329.zip
Rate This Tutorial
Once you have completed this tutorial, please give it a rating:
1 Ratings
(5)
Comments
Be the first to add your voice here!
Please first login to add your comments
Other Tutorials In This Category
-
 Make Characters Slowly Fade Through Walls1 Rating (5)
 -
 How to make force lightning in Moho (Anime Studio)1 Rating (5)
 -
 Moho 12 Motion Blur Settings2 Rates (4.5)
 -
 Mandalas3 Rates (5)