Search Shared Files
Found 46 results for layer effects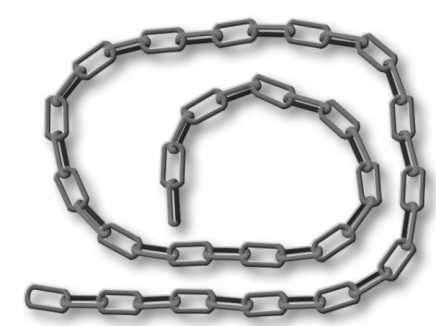
www.animestudiotutor.com/shared_files?id=378
20 May 2017 admin
-- Bone layer, bones created with 'Sketch bones' tool, shadow layer effect
--- Chain, drawn in vector layer, layer effects added
The chain is created in three parts to give the 3D look. Each part has a style that can be changed.

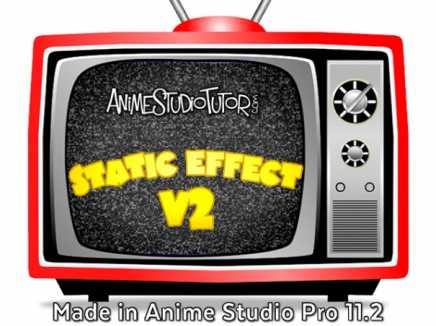
www.animestudiotutor.com/shared_files?id=270
7 January 2016 admin
Made 100% in Anime Studio Pro 11.2 (all vectors) but a version for Anime Studio Pro 9 is included.
There are a few ways to create the static, but this example uses the 'spots' layer effect. Using a switch layer I flip between a few versions to create the animation.
Note: The effect can only be seen once rendered
Please do comment below if you have a better way of doing this.
www.animestudiotutor.com/shared_files?id=458
14 November 2017 admin
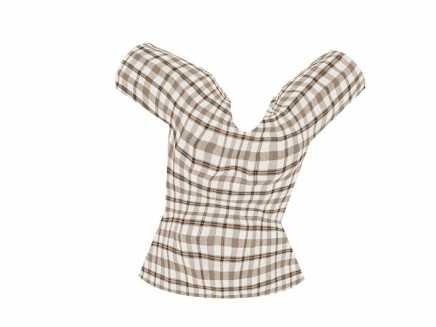
This example file uses the smart warp layer feature of Moho Pro 12 to morph the texture.
A grid was first drawn, then 'draw' > 'Triangulate 2D Mesh' was selected to create the suitable warp layer. This grid was then applied to the image layer via layer settings > Vectors > Smart warp layer. On frame 1, this grid was then moved to the curves of the t-shirt.
Masking and bones were also used.
Before: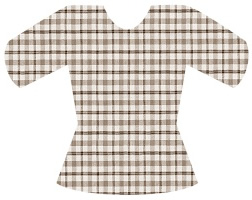
After:

www.animestudiotutor.com/shared_files?id=360
15 April 2017 admin
Created by Víctor Paredes
Create several horizontal bones. then in frame one rotate them to create the path. The snake layer (a vector layer inside the bone layer) must be moved from one extreme of the bone chain to the other. The body has to have several points to move smoothly. 
www.animestudiotutor.com/shared_files?id=40
1 August 2013 admin
*Anime Studio 9.2+ required.
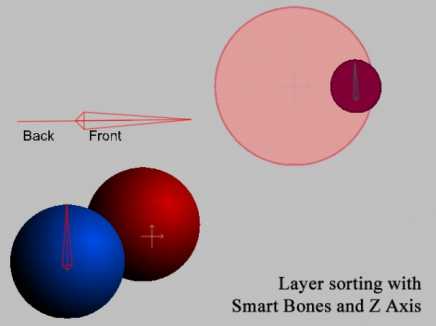
As we can't yet use the 'Animated Layer Order' with smart bones, the work around is to control the layers with their Z-axis setting. In the two examples provided you will see how one smart bone moves a layer to the back or front.
The setup:
Frame 0 of the Mainline in the smart bone action (X: +0.001)
Frame 1 in the positive action of the smart bone for the layer that you need to control. (X: +0.001)
Frame 1 in the reverse action (X: -0.001)

www.animestudiotutor.com/shared_files?id=196
30 May 2015 admin
This kaleidoscope effect was made in Anime Studio Pro 11 using the new reference layer option.
There is one large image that moves inside a masked layer that has been copied. Some of the copies have been flipped to add to the effect.
You only need to change the image and animation of the image layer to have a go.
Render times may be slow on older machines.
There are a lot of possibilities to explore.
www.animestudiotutor.com/shared_files?id=286
3 April 2016 admin
Here is another way to create a TV static effect
-Pixelation is set to 2 on the TV screen group layer
--The layer inside this group has 'Noise' set to 250 then loops down to 230 over 25 frames
Thanks to Víctor Paredes for the pointer.
It's best watched in 480p or better.
Version 1 can be found here
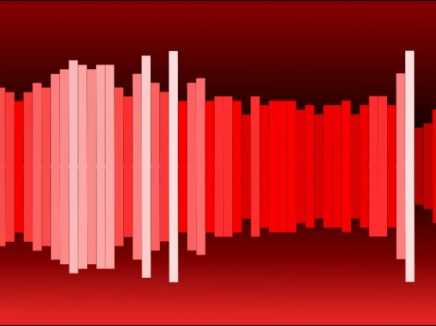
www.animestudiotutor.com/shared_files?id=398
20 June 2017 admin
Switch layers can be controlled by an audio file.
Switch layer settings > Switch > Select audio sync source.
The layers are selected automatically from the bottom (quietest) to the top (loudest).
In this example, the bar has 30 layers, starting from short to long, and grouped into a switch layer which has the audio sync applied to it.
I copied this switch group 60 times to the right, offset by 1 frame, using the Delayed Layer References tool.
I then grouped them all, copied the group, flipped them downwards and moved this new group down.
Music: www.bensound.com
www.animestudiotutor.com/shared_files?id=80
26 September 2013 ahzra
Full body rotate experiment by Ahzra using bones and layer order
Head turn can be found here
www.animestudiotutor.com/shared_files?id=405
27 June 2017 admin
All the layers are in a group with the physics option on.
The bone layer has 'Pivot on origin' selected in its physics settings.
Using the 'Bone Physics' tool whilst on frame 0, and with the bone layer selected, select the last bone in the chain, then select 'lock tip' from the top menu.
Showing tutorials 1 to 10 of 46