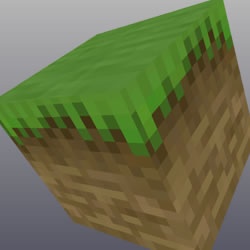
Minecraft Style Blocks
Tutorial Number: 161
Made with: Anime Studio Pro 9.1
Level: Intermediate
This tutorial will show you how to create a 3D Minecraft style block in Anime Studio using a simple 16x16 pixel image.
Contents
1. Understanding Nearest Neighbor Sampling
Tip
When scaling blocky bitmap style images (such as icons, sprites etc.) or when creating 3D shapes with image layers in Anime Studio, turning the 'Nearest Neighbor Sampling' option on will often be required.
From the user guide:
"Nearest neighbor sampling: When this option is not checked, Anime Studio will try to smooth out the areas in between pixels when you enlarge the image. If you want the images to look blocky when they are resized, turn this option on. Anime Studio will not smooth the image and it will start to look blocky when it is enlarged."
This option can be found in the settings of the image layer, under the 'image' tab.

FIGURE 1-1 Image layer settings
A close up example to see the difference:

FIGURE 1-2 Turning the nearest neighbor sampling on can sharpen blocky images
As you can see from this example, if we want to maintain sharp edges for our pixel art, then we should turn this option on.
You may also need to turn this option on if you're creating 3D objects from image layers. In the following example, you'll see when this option is off, the objects have a white line border.

FIGURE 1-3 nearest neighbor sampling off - notice the white edge lines
The same image, but each image layer has the nearest neighbor sampling set to on:

FIGURE 1-4 nearest neighbor sampling on - white lines are gone
2. Source Images
You will need to source three image textures for this grass styled block:Grass, side and maybe a mud texture for the bottom.
There are lots of sites on the Internet that will help you with this, such as:
planetminecraft.com/resources/texture_packs/
minecrafttexturepacks.com
planetminecraft.com
Note: You will find the images used in this tutorial in the download.
In this tutorial the images are 16x16 pixels - this size works well and it's also the same size as the minecraft textures.

FIGURE 2-1 Three images required for the block
3. Importing
Import the first image into Anime Studio then scale it to x:20 by y:20
FIGURE 3-1 Import and scale the first image
Double-click on the image layer to bring up its Layer Settings, then click the 'Image' tab at the top.
Turn on the 'Nearest neighbor sampling' option.
FIGURE 3-2 Turn on the 'Nearest neighbor sampling' option.
4. Sorting Layers
Although Anime Studio is really a 2D animation program it can do some clever 3D things. In order for us to continue, we need to tell the program to start sorting the layers in a 3D environment.Turn the depth sort on:
File> Project Settings > Turn on 'Sort layers by depth'

FIGURE 4-1 Sort layers by depth
Note 1: 'Sort by True Distance' tells Anime Studio to sort the layers by the distance from the camera to the layers' origins, rather than by depth. Usually this option will be left unchecked.
Note 2: This will not effect layers within a group, so if later we decide to group our blocks, then we would need to enable this setting in each group's layers settings too.
5. Create 3D Blocks
Duplicate the image layer 5 times so that you have 6 image layers.
FIGURE 5-1 Duplicate the image layer
Now we need to position each layer within the 3D environment.
Select the first layer from the bottom, then select the Translate Layer
 tool - and set the z: to 0.655 (Hit 'Enter' to update the value) in the toolbar at the top.
Select the next layer up and set to Z: -0.655
Select the next layer up and set to X: 0.655, now this layer also needs to be rotated, so select the 'Rotate Layer' tool and set to Y rotation: 90

FIGURE 5-2 Rotate the layer
Select the next layer up and set to X: -0.655 and then rotate it to Y rotation:90
Select the next layer up and set to Y: 0.655
Select the last (top) layer up and set to Y: -0.655 and then rotate it to Y rotation:90
6. Swapping Images
Now everything is in place, it's time to swap some images and to rename the layers.Double-click on the top image layer to bring up it's Layer Settings (Assuming this is your lower/bottom layer of your 3D cube).
Rename the layer if needed (for example 'bottom side), then click the 'Image' tab at the top.
Click the 'Source Image...' button and select your bottom/ground/base image.

FIGURE 6-1 Change the source image of the top and bottom layers
Click 'OK' to close the settings.
7. 3D View
Now your block is complete you can use the Orbit (9) tool to move around the scene and view it in 3D!
FIGURE 7-1 Orbit tool
Grouping the image layers will help you later if you decide to duplicate your blocks - just remember to turn on the 'Sort layers by depth' option for that group layer.
Tip
When creating new groups in a 3D environment, ensure the group layer has had its position and rotation settings reset to 0 - things can become a little messy if you forget to check this.
Anime Studio can handle quite a few of these blocks, but it can handle 100's - so you need to plan your scene well. Hiding unseen sides can improve speeds.

FIGURE 7-2 Example of what you can create with these blocks
Supporting Content
Download Details
Zip File Size: 4KB
Last updated: 7 Mar 2013 08:41:54
Made with: Anime Studio Pro 9.1
File Name: anime_studio_tutor_files_161.zip
Last updated: 7 Mar 2013 08:41:54
Made with: Anime Studio Pro 9.1
File Name: anime_studio_tutor_files_161.zip
Rate This Tutorial
Once you have completed this tutorial, please give it a rating:
4 Rates
(5)
Comments
-
Member Since: 3 March 2010Last Logged In: 14 April 2024Comments: 134Tutorials Completed: 10570A quick animation made in Anime Studio Pro 9.1 using these Minecraft style blocks
-
Member Since: 17 February 2013Last Logged In: 11 April 2024Comments: 23Tutorials Completed: 61
-
Member Since: 3 April 2013Last Logged In: 31 July 2014Comments: 3Tutorials Completed: 1
-
Member Since: 18 November 2015Last Logged In: 23 April 2023Comments: 24Tutorials Completed: 68


Other Tutorials In This Category
-
 3D Shape Design8 Rates (4.5)
 -
 Making 3D Objects3 Rates (5)
 -
 Basic Poser 3D Import1 Rating (5)
 -
 3D buildings in Anime Studio Pro or MOHO pro 123 Rates (4.3)

Please use the 'reply' button on a comment if you wish to reply to someone.