Backgrounds With Brushes
Tutorial Number: 162
Made with: Anime Studio Pro 9.1
Level: Basic
In this Anime Studio Tutorial, we look at how to create a background using the brush settings of a simple line.
As the line can be as long as needed, this technique is ideal for long repeating / looping designs.
This tutorial comes with help from Jorge Merino - Graphic Designer. He has also very kindly provided some sample brushes for this tutorial which can be found in the supporting content.
Click here to view FREE Anime Studio Brushes
Contents
1. Copy images into brush folder
Close the Anime Studio program if you have it runningLocate the 'brushes' folder for Anime Studio and copy the brush images to this folder.
Note: You may have two installations of the program if you have a 64bit machine – so you will probably want to copy the images to the other installation as well.
If you're using Microsoft Windows, the location path will probably look like this:
C: > Program Files (x86) > Smith Micro > Anime Studio Pro 9 > Resources > Support > brushes
Or / and this:
C: > Program Files > Smith Micro > Anime Studio Pro 9 > Resources > Support >brushes
2. Draw horizontal line
Open Anime StudioHit 'A' key to select the 'Add Point Tool'.
Draw the line half way down, making it a little bigger than the scene.

FIGURE 2-1 Draw a horizontal line
Tip
Holding the 'Shift' key while drawing the second point of the line will lock it into a horizontal or diagonal projection.
3. Create the shape
We now need to turn our line into a shape that we can apply a style to.1. Hit the 'U' key to select the 'Create Shape' tool
2. Click on the line
3. Click on the 'Create Shape' button

FIGURE 3-1 Create the shape
4. Apply brush settings
1. Hit the 'Q' key to select the 'Select Shape' tool2. Click on the line

FIGURE 4-1 Select the line
3. Click the 'No Brush' image in the style panel
4. Select the mountain scene
5. Set the brush jitter angle to 0 - we don't want the image to be rotated randomly
6. Set the brush spacing to 124 - this size works best for this image - you would need to test other numbers with other images
7. Select the 'Minimize frame-to-frame randomness' to keep the brush from jittering during the animation.
8. Hit ok to set the brush
9. Enter 250 into the line width then hit your Return/Enter key to set - again, this size works for this image

FIGURE 4-2 Apply the brush
Tip
Here we set the line width to 250 to set the size - you could also put this line into a group, and resize that group layer
Tip
With the line selected, you can use the left ( [ ) and right ( ] ) brackets on your keyboard to change the line width
5. Add more layers
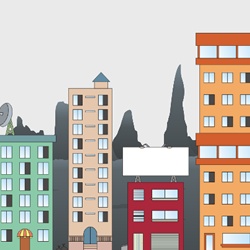
scroll.anme (found in the supporting files) is an example use of this technique.Although this scene was made using only two lines, the buildings needed to be much larger than the allowed maximum line height. So it was placed in a new 'group layer' which was then resized larger.
The two layers were then moved at a different rate in the animation. This gives the perception of depth (called parallax scrolling).

FIGURE 5-1 Two layers - each with only a line with a brush style
To add to the effect of depth, you can increase the blur radius of the far objects. This is done in the layer's settings [FIGURE 5-2].

FIGURE 5-2 Add blur to far objects / layers
This technique can be applied to trees, fences, clouds, grass, water and much more. As the images are pre-drawn, Anime Studio will work quickly with these images too.

FIGURE 5-3 More examples of this technique, including forests, fences, and chains
Click here to view FREE Anime Studio Brushes
Supporting Content
Download Details
Zip File Size: 415KB
Last updated: 19 Feb 2013 16:45:21
Made with: Anime Studio Pro 9.1
File Name: anime_studio_tutor_files_162.zip
Last updated: 19 Feb 2013 16:45:21
Made with: Anime Studio Pro 9.1
File Name: anime_studio_tutor_files_162.zip
Rate This Tutorial
Once you have completed this tutorial, please give it a rating:
10 Rates
(4.7)
Comments
-
Member Since: 3 March 2010Last Logged In: 14 April 2024Comments: 134Tutorials Completed: 10571An example by Jorge Merino. He used this technique to create the mountains in the background:
-
Member Since: 3 March 2010Last Logged In: 14 April 2024Comments: 134Tutorials Completed: 10571This looping background video was created quickly in Anime Studio using this tutorial
-
Member Since: 3 April 2013Last Logged In: 31 July 2014Comments: 3Tutorials Completed: 1
-
Member Since: 21 August 2013Last Logged In: 31 October 2018Comments: 3Tutorials Completed: 6
-
Member Since: 23 September 2013Last Logged In: 17 May 2015Comments: 2Tutorials Completed: 71Im cannot download.

Download Error Brushs:
The file was not found or has expired.
Thanks.-
Member Since: 3 March 2010Last Logged In: 14 April 2024Comments: 134Tutorials Completed: 1057admin says:
15 September 2014 at 01:41:34 PMThere was a problem with the downloads. This has now been fixed.
Please get in contact if you are still having problems downloading.
-
-
Member Since: 23 September 2013Last Logged In: 17 May 2015Comments: 2Tutorials Completed: 7
-
Member Since: 11 September 2019Last Logged In: 1 June 2023Comments: 4Tutorials Completed: 4


Other Tutorials In This Category
-
 Draw cartoon clouds in Anime Studio2 Rates (5)
 -
 Adding Torso Shading in Anime Studio2 Rates (5)
 -
 Polishing Up Facial Shading in Anime Studio1 Rating (5)
 -
 Shape Stacking pt 11 Rating (5)

Please use the 'reply' button on a comment if you wish to reply to someone.